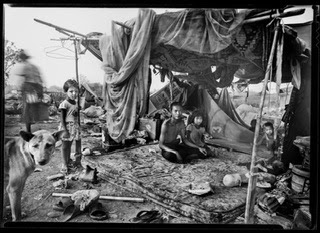
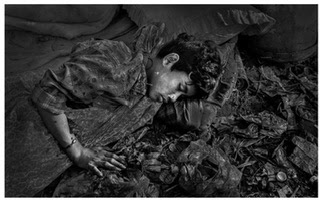
After a bit of laziness today I got into the dark, turned on the John Coltrane jazz (a new LP "Stardust") and got back to work on my first exhibition print. This photograph is part of the 7 I will make from the last week of my fathers life. I decided to print these pictures darker and with more contrast. My hope is to slap the viewer and pull them out of their apathy. I want to draw them deep into the photographs, disturb them a bit, get them emotionally involved, talking and thinking.
The photo shown below is printed on 20x24 Ilford FB warmtone paper. I am using 2 types of masks, one for a fog burn on the upper right corner and the other is a blocking mask (invented that term I think) to protect the parts of the image I do not want to go black. In the upper right corner of this neg is some serious light fog. I found the best and most dramatic way to deal with it is to use the two masks then expose the paper in the easel using a normal flashlight. I hold the lower blocking mask down with magnets, I also use magnets on the printing metal frame arms to avoid any partial light leaks. Another thing I needed to do was to add long strips of black plastic round the outer edges of the print frame arms to keep the paper white there.
Here are the other printing steps involved.
- F2.8 on El Nikkor 50mm lens
- Filter 3.5-150 second main exposure, with dodges of 100 seconds on the face and 50 seconds on the lower left corner (using round tools, large and small circles).
- Filter 1-80 second burn of the blanket (using my hands) also burn the upper top left black at the same time.
- Filter 1- 50 second additional burn on the highlights of the blanket.
- I then do the flashlight burn of the fogged areas as listed above.
- Development is 3 minutes in Dectol 1/1 (1500ml /1500ml for the large tray).
- The enlarger (my favorite) is a Durst 1200 condenser which was given to me by a good friend.
Later I will bleach each print, especially in areas around the mouth and eyes using a q-tip. I want to create as much drama in the image as I can. This printing style of darkness with sharp contrast and bleaching of 35mm negs is influenced by the great W. Eugene Smith (my photography idol).
Note* The picture is razor sharp with pronounced grain and contrast. Some of the GoPro pictures below show blurring that does not exist in the print.
Note** This is the 3rd attempt at the print, the first 2 had serious problems as a result of mistakes during the flashlight fog burn. Those problems seem to be solved in this version (the invention and use of the blocking mask). I plan on making 1 maybe 2 more print versions then bleaching. Once that is completed I will then run the prints through my secondary process. A second fix, hypo clear, selenium tone and archival wash before air drying, flattening, spotting, matting and framing. Gosh that is lots of steps!!!
Update* I wonder if should mat the print so there is a thin white line around the edges, it might create a nice look. I prefer to have a free standing print that can be rewashed at a future date, I never dry-mount my photographs as that is not an archival process. The glue and mat board used in the dry-mounting process are not good for the longevity of the prints life.
Update** On print #4 I added 2 burns. 50 seconds to the pillow-blanket area to the right of dads head and 40 seconds to the bottom right corner, both burns were done with filter #1 at F2.8.
Update*** On the #5 print I extended the second blanket burn at filter #1 from 50 seconds to 8 seconds (used my hands as burn tool).
Update**** I gave the 3 prints a second fix bath of 2 minutes, then a hypo clear of 5+ minutes followed by a toning in 1/20 Selenium (100ml Selenium to 2000 water) for 2 minutes. The toning seemed to give a slight (more silver warm) color change and will add permanent protective coating to the print. I also gave the prints a 2 hour archival wash. Will let them air dry and see where I am at tomorrow.
 |
| 3rd attempt dad "Pain" photograph, pics made with GoPro 2 |